

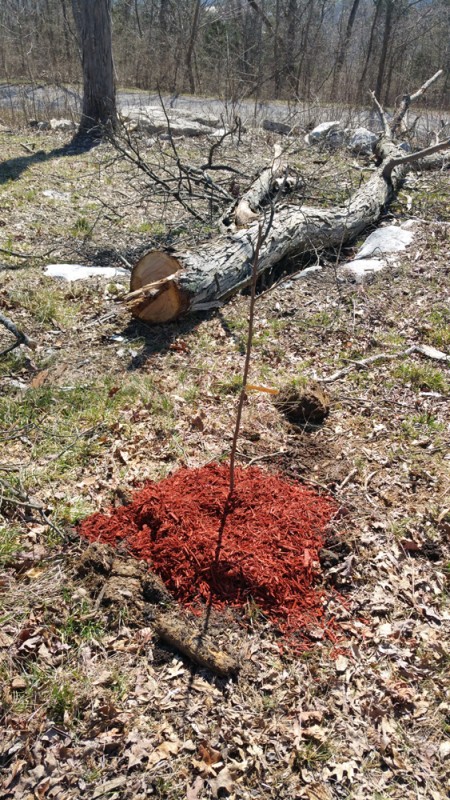
Part of my orchard, the red arrows indicate a newly planted fruit tree.
Recently on a Saturday between kids birthday parties I had some time to kill so wandered over to a nearby Lowes to look at the plants and I’m glad I did. I shop a lot at Lowes and Home Depot but generally their plant selections aren’t too great, especially the sort of stuff I like, but every once in awhile I get lucky, and I should say Lowes here had a much better selection of what I like than Home Depot, and I still haven’t found a really great local source for what I like (rare interesting conifers).
So I got lucky and picked up three trees, a weeping blue atlas cedar which I’ve wanted since I saw it on Paul James all those years ago, but could never grow before because where I was in Michigan it wasn’t hardy. A vibrant blue upright juniper, which I’ve grown before and I love it as an accent landscape planting, and finally, the one I want to talk about today, a variegated holly.
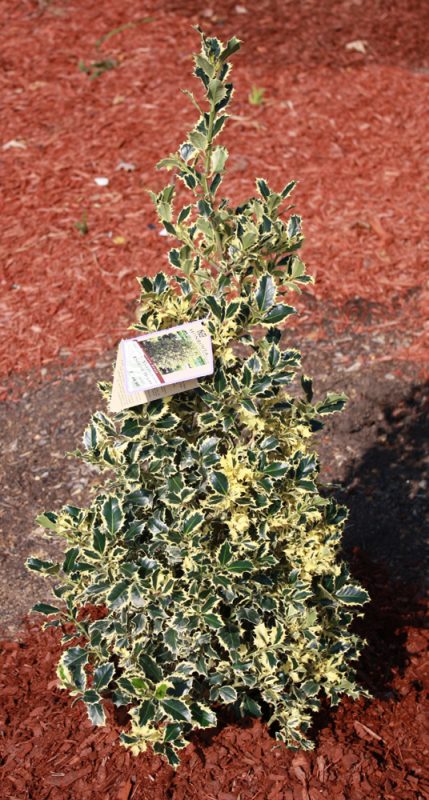
I had quite frankly never seen a variegated holly before. Overall I’m not a fan of regular hollies, they just don’t do it for me, I think they can end up looking sloppy. I do like the columnar varieties like ilex ‘sky pencil’ though. I see the value in them for the red berries which can be bright and food for wildlife, but I can’t see myself growing a plant just for decorative berries.
However, add the variegated foliage to the mix and I got really excited about it. Not just dark green and red, but dark green, yellow, and red, so much more interesting. Mine of course doesn’t have berries, not yet, but when it does it will look attractive.
It is also nice because while it may feed the birds, it doesn’t feed the deer. The spiky leaves are generally immune to animal browsing, and in my new garden there is definitely deer pressure.
I’ve planted it in the front ornamental garden (in progress) of my future house (in progress). My overall goal with this garden is to make it a cacophony of contrasting foliage plants, similar to a Japanese style garden but not limited to Japanese plants. Flowers are all well and good but a vibrant blue evergreen will be blue all year round, and my hollow will be yellow and green all year round. These are my favorite sorts of gardens and so of course I want one for myself. I will be a showcase for the wide variety of rare dwarf conifers I hope to cultivate,, and this holly will make a nice focal point.
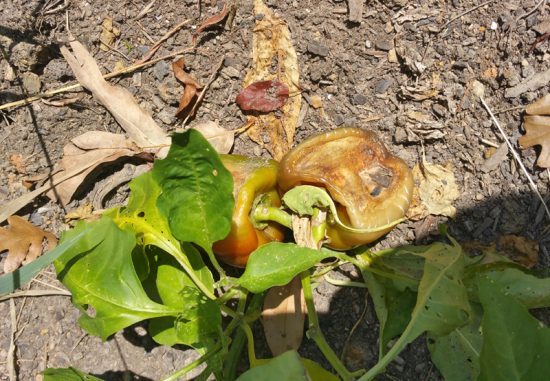
I am learning a lot of new things gardening in a new state. Including something recently. I really like growing peppers, all kinds, I think they’re relatively free from pests and diseases (especially hot ones) and we eat a lot of peppers. Bell peppers are one of the few vegetables neither kid complains about.
So I planted a lot of peppers this year, and they grew well, but I’ve had crap for yield, they keep rotting on the plant. They’ll get this spot, and it’ll be yellowish white, then it’ll turn more white, and then it’ll get bigger and bigger and bigger. It looked to me like some sort of fungal infection.
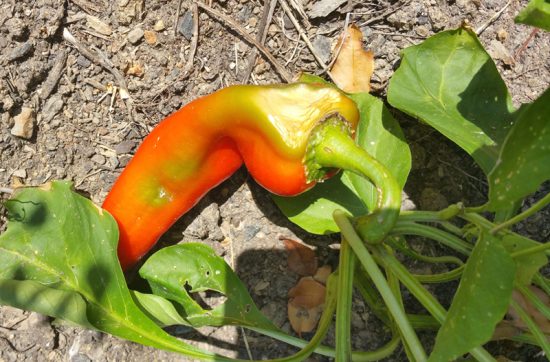
I finally looked it up, this isn’t a pest or a disease, but the effects or heat and direct sunlight. In Michigan we always worried about peppers getting enough heat and sunlight, apparently here in Tennessee-almost-Georgia its the opposite. Too much heat and too much direct sun causes the flesh to simply get scalded away, and then it does become an avenue for infection, and the fruit rots. I was glad to find out the cause wasn’t going to require fighting another infestation, but I’m not sure a good solution. The leaves need sun to develop large fruit, but the fruit needs to be as shaded as possible. Fruit socks anyone?
This also happens to tomatoes which explains why I had these whitish gashes on them as well. Although for those, since I basically make sauce with all my tomatoes, I just cut off the damaged portion and still used them.
It is probably extreme this year. Last year around this time it was far more rainy and cloudy down here. This year we’re in the midst of a drought and rarely even have an overcast day, let alone rain. We’ve had one overcast day, the only one with rain, in the past 4 weeks. Lots of plants are dying, trees are dying, the drought stress is significant. I’m keeping my finger’s crossed for rain tomorrow, it is in the forecast.
In the meantime I will water my peppers and maybe try moving them (many are in containers) to where they get morning sun but afternoon shade.
We’ve been having a drought here, and up where my house is being built my fledgling fruit orchard is not doing super great, just not the sort of summer where they’re going to put on a big fat growth ring.
But a few of my apples, specifically my Honeycrisp, are doing particularly bad. They’re invested with something. Two have damage on every leaf, and have lost many leaves, if it continues unabated I could lose the trees.
The leaves are skeletonized in a very very fine fashion, more fine than like what japanese beetles will do. There are also bits of webbing, curled leaves, and black debris that is either droppings or eggs.
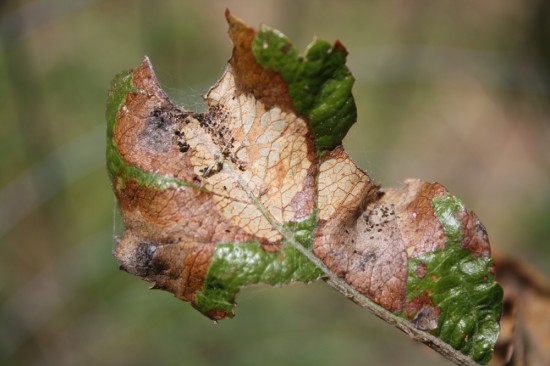
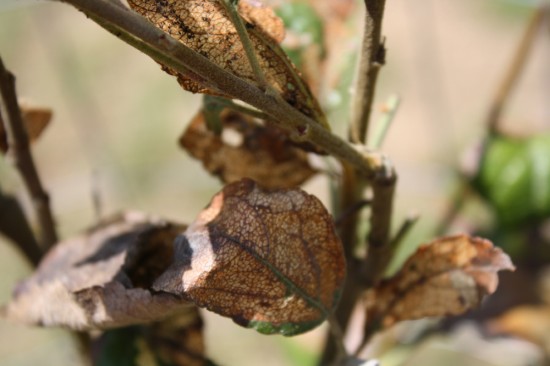
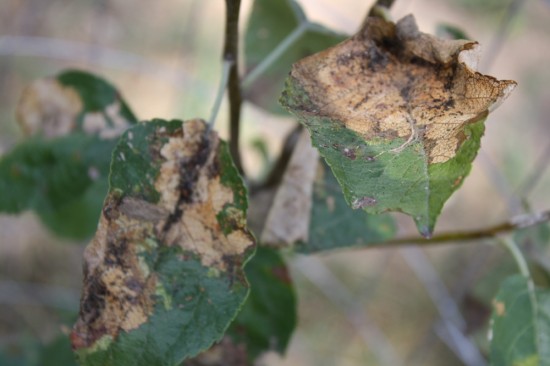
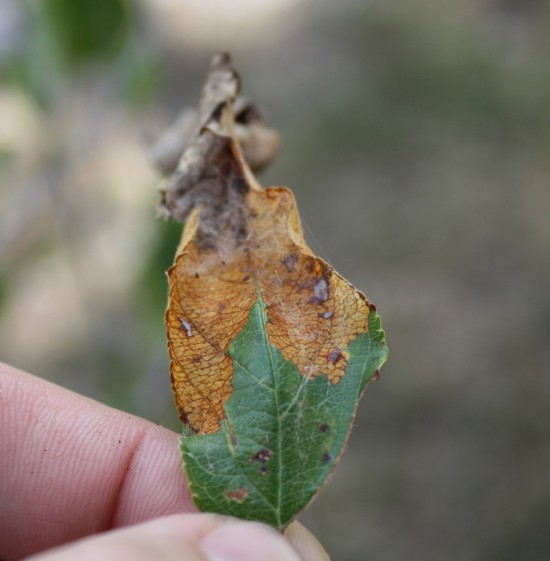
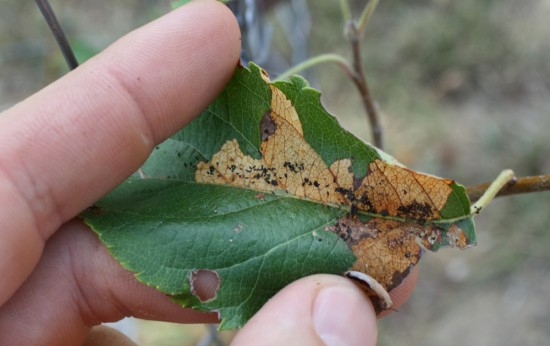
I believe what I have is an infestation of Choreutis pariana, or the apple leaf skeletonizer, or apple-and-thorn skeletonizer. It is a little moth, an invasive species from Eurasia introduced in 1917. It is a tiny little moth only about a quarter of an inch long. It’ll hit apples, crabapples, birch, cherry, hawthorn, willow, and ash. It’ll lay the eggs, the pupa will hatch and eat my leaves and poop all over and curl the leaves and leave bits of silk, and then turn into a moth and start all over again with a 30 day life cycle.
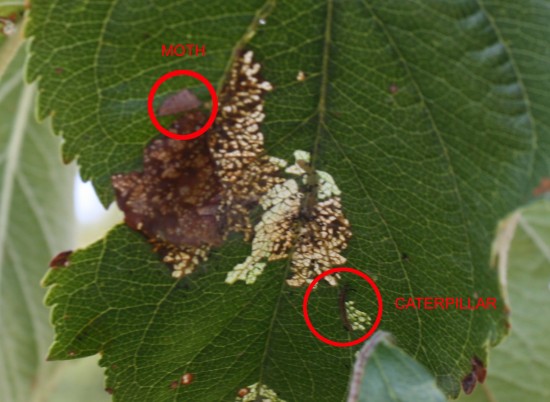
Luckily it looks like they can be controlled with Sevin and similar pesticides. I don’t really like using these products, especially on a fruit tree, but this IS an invasive species, and I don’t have any apples on the tree currently, and if I don’t do something I may never have any apples. So. these bugs have a date with the sprayer.
I’m sure we’ve all seen this commercial, you turn the water on and this hose grows, stretching to where you need it, you turn the water off, and it shrinks back, neatly putting itself away.
It does not actually work like that.
I was given this hose for free to try out, and now I get to let you know how it went.
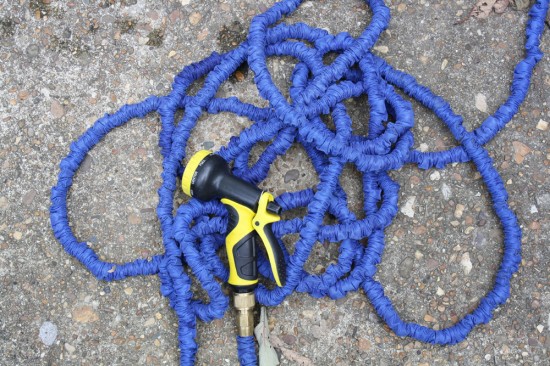
So, the outer canvas wrap is mostly for looks, it doesn’t seem to serve a purpose (but it does, read on), instead there is some sort of very stretchy rubber hose on the inside. It does stretch, but more in girth than in length. As it fills with water pressure builds up inside and the rubber inner house expands, as you spray water out of the house pressure is relieved and it shrinks. The canvas wrap is there as a backstop, to prevent it from expanding too much, and bursting like a balloon. Picture a balloon inside of a pillow case.
So you turn it on, it expands slightly (I would say no more than 20% in length), and use it to water. Then you turn the water off, and it shrinks…. nope! It doesn’t, you can turn the water off but so long as pressure is still inside the hose it will not shrink. After you turn the water off you need to run the hose for some time, I would guestimate 30 seconds, in order for it to shrink back down in size.
The house does not take standard fittings, it came with it’s own fittings, and they seem nice and are quality enough, but in the end, the “expandability” is a gimmick. This hose certainly functions as well as any other hose, but I don’t see much use in the expandability, at least in the garden, because something that stretches in girth is not helping us keep our hoses neat and tidy.
Where I can see a use is if you need to pack the hose away, or travel somewhere with it. That a very long hose can fit into a little box is certainly useful, and overall it is lighter as well. You could certainly more easily tuck it away into a planter or something. this 100ft hose came in a box about the size of half a two liter bottle, and it included a spray nozzle in the same box, that is really small, a standard 100ft hose is big and bulky to carry, and may even be too heavy for many people, this is light.
So, buy it if you need a hose that can be stored in a small container, or a lightweight hose of reasonable length, don’t buy if the commercials gave you the same impression they gave me, that of a hose that more or less puts away itself.
I’ve been working on this post for months, because it is a months long process. Taking pictures along every step of the way, documenting the process. And then I lost a ton of pictures. I used some recovery software and was able to get some of them, but not all, so there are far fewer pictures in this post than I originally intended.
To grow sweet potatoes you don’t use seeds, you use slips, which are tiny sweet potato plants. To make these slips you need to put a sweet potato, or pieces thereof, into water for weeks. Roots will come first, and later sprouts will come out. There are two main ways to do this.
1. Whole Potatoes
I recommend buying organic sweet potatoes, or from a farmer, or use ones left over from your last harvest, because some store bought potatoes may have been sprayed with something that inhibits sprouting. Weirdly shaped ones work well. I used old pasta sauce jars and found some potatoes that would stick down in the jar while creating a cork like seal at the top.
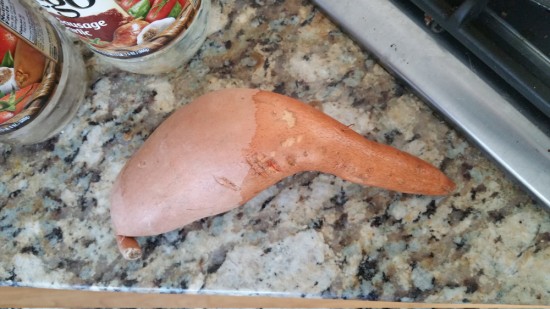
Every sweet potato has two ends, a stem end and a root end. You need to learn how to identify these ends because it is the root end that needs to be submerged. Sometimes a bit of root or bit of stem will still be attached to the potato, in which case, you have an easy job. Otherwise you need to look closely at the spud, the root end tends to be pointier, and the stem end chubbier.
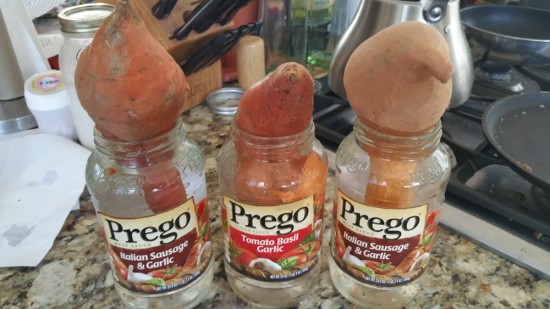
You will need to make sure the root end stays submerged constantly for weeks until you see sprouts. My batch done with whole potatoes like this did not produce well.
2. Potato Chunks
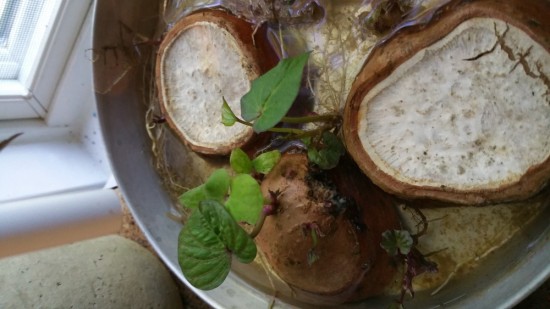
The second method is to cut your potatoes up into chunks and put the cut sides down into water, I used a 9″ cake pan to hold these. Here it is less necessary to identify the stem and root ends, but this method required more frequent water monitoring.
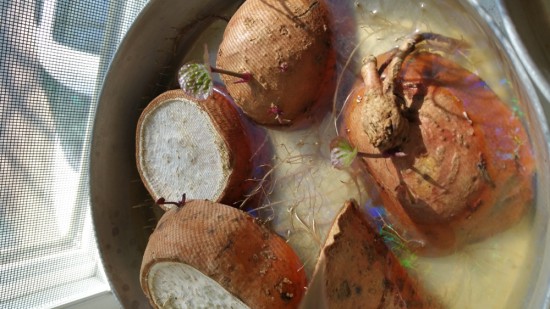
Overall I had much better production this way. This way also had the benefit that once the sprouts came I could raise the water level, allowing roots to start forming at the base of the sprout, then a few weeks later, I was able to cut off the sprout, leaving some roots attached.
I also tried slices that wouldn’t fit into my cake pans suspended in a cup of water. Which also did okay.
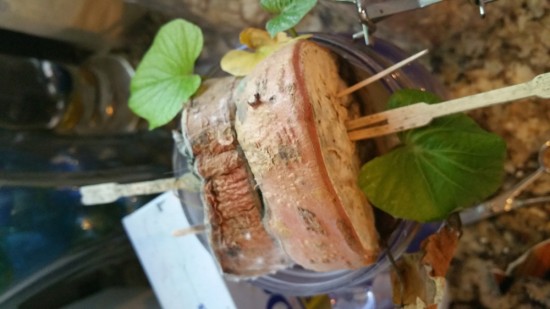
Harvesting the Slips
Once the slips get a decent size, 4-6 inches, you cut them off and put them back into a water container so they can develop roots on their own. At this point, a humidity tent like a plastic bag would help since their main water source, the roots attached to the potato/chunk, has just been severed. However if you did as I did above with the chunks, raising the water level, each slip might already have roots.
Once the slips have a good quantity of roots you can transplant them out into your garden and they will make more sweet potatoes for you.
You can also harvest several rounds of slips from each potato chunk, after you harvest the first round the roots the potato grew are still working and it should quickly send up more slips. The process is still very slow though, overall for me it took close to 10 weeks from start to finish.
Late in the Fall, before frost, you can probably take cuttings from any sweet potato vines in your garden, and if you have a nice indoor setup you can probably store them indoors over the winter, and then plant them back out in Spring, saving you this step. I intend to try that this winter and I will let you know how it goes.
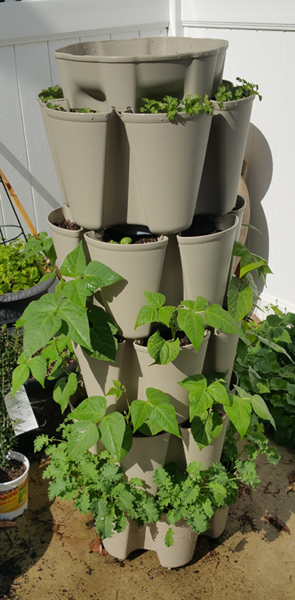
As I’ve said frequently, one of the best parts of blogging is the free review swag. I sometimes turn things down, honestly, if I just think it’s a bad idea or I know I won’t like it. But I was happy to accept the Greenstalk container, because it looked like a good idea.
Essentially this is a strawberry pot on steroids. There are 3 and 5 tier sets and you stack them. It isn’t a self watering container, but there is an integral watering system whereby you put your hose into the top and it trickles down into reservoirs for each tier. These reservoirs could be bigger I think, in the sun in the heat of summer I think this could required multiple daily waterings.
Putting it together was easy, but it felt unsteady until I loaded it up with soil, and boy does this thing eat a lot of soil. So so so much soil. You will be buying a lot of potting mix to fill this up, but also your plants will have ample room for root growth. Most of the soil surface though is not open to the surface, so your plants will need to send their roots sideways into the middle of the structure. This middle however is away from the drip irrigation system and of course covered from direct watering so will likely be very dry, roots won’t want to enter it. I will have to check after the growing season is done but I’m not sure roots will get into the middle which makes it wasted space and wasted potting mix.
So, I have an in-ground garden I’m planting of course, but I’m also planting this thing. I actually planted in my garden weeks before I planted this. Guess which one has bigger plants? The Greenstalk does.
This is for a couple reasons, one is that I can’t water my garden, it is at the construction site where our house is being built and there is no plumbing or anything. So I have to rely on rain. I’m able to water the Greenstalk whenever as it is in the backyard of our rental. However, an underappreciated reason why the plants are doing better, and why they germinated faster, is because, this big columnar container, gets good sun exposure and the sun beating down on the sides heats up the soil, which heats up the seeds, which improves germination. This is good for now, in the Spring, but bad for Summer when that heat will increase watering needs.
So, if the proof is in the plants, the product works, everything I planted is doing great. Having the columnar design poses some planting challenges. You must either place it in the middle of a wide open area so there is decent sun exposure on all sides, or accept one side will be shadier than others and perhaps have that influence your planting decision. Option 3 is to MacGyver up an automatic turn table to slowly rotate it like a dish in the microwave.
Is this product perfect? No. It is still a fairly unstable structure, the tiers sort of clip together but it isn’t a strong connection, most of the structure is coming from gravity, from the weight of the soil. A couple of boys horseplaying around could knock it over, spilling plants and soil.
Filled up as it is, the thing is heavy, a caster base would be a big improvement so you could move it. I’m a big strong man and I can push it around, but many gardeners will not be able to. Especially if the soil is wet as it should be. And of course I need to push from the bottom tier lest I knock one of the top ones off.
Watering it is a bore, you hold your hose up to the top and stand there for a few minutes. A clip attached to the top tier that could hold a hose in a place would be an improvement. That way I could put the hose on and do some other chores while it fills up.
The top surface is wasted planting area, a top cap (smaller in diameter that would require separate watering) would be a good idea, to take advantage of the great sunlight the very top gets. you could put the aforementioned hose clip on this top piece.
So, what did I plant in this strawberry container on steroids? Not strawberries. I like strawberries in a garden where they can spread and fill a whole patch. The bottom tier is kale, the next two tiers are bush beans (I think bush beans will do very well in this thing, and so far I’m right), then it is basil, and the top tier is flat leaf parsley. I sorta did biggest to smallest from bottom to top, obviously to keep the upper plants from shading the lower plants too much. I think I’m going to really like this for bush beans, they’ll be easy to see, and easy to harvest. If the top cap planter existed I would put in a low water need trailing herb like thyme, or a low water need flower to bring in the pollinators like begonias.
I was doing some tidying up in the “back yard” of our rental house where we’re living while we’re building our forever home and I moved this plastic adirondack style chair and what did I see under it? Boom:
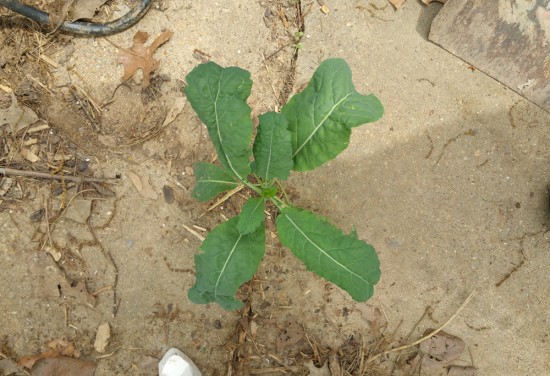
Kale Growing Through a Concrete Crack
A 16 inch tall kale plant. What is this sorcery? I’ve planted kale this Spring in my garden, it is, 3 or 4 inches tall. I planted kale late last fall, some of it survived the winter, and it is doing even worse, even smaller, than the stuff newly planted this Spring. So where did this bit of tuscan kale come from? Did I drop a seed last fall, have it germinate, and through the protection of the slatted adirondack chair get just enough insulation to thrive? We even had some serious flooding rains in December or January where an inch of water was flowing over this spot for a good time.
Or was it a seed I dropped this Spring that grew super fast because under this concrete is a cache of super soil?
I’m not sure really, if I had to guess I would say it is likely a seed I dropped last fall that germinated this Spring and has managed through just a little bit of shelter and warmth to thrive. Heat really is perhaps the most under appreciated aspect of gardening and or plant growth. Seeds need certain soil temperatures to germinate, and plants need certain heat levels to grow well (but of course, if it gets too hot, their growth will slow). A little shelter, a little insulation, a little chair provided microclimate was just enough for this little kale plant to take off.
And now, I get to eat it.
What can be learned from this? To quote Dr. Malcolm from Jurassic Park “Life finds a way.” Or, you really don’t need that much space to garden.
The modern method of building is to wipe all the top soil away from a lot, build a house, and bring back 3 or 4 inches or soil or just sod and call it good.
This, of course, is not good for gardening, and many people want to increase the depth of the top soil on their property. But how? I see advice posted how you just top dress your lawn, add an inch a year, or whatever. So you slowly bury your driveway and sidewalk? Other people bemoan the thought of digging up everything, digging out some of the fill soil, and then adding new top soil. Common knowledge is that there is no other way, that top soil is like fossil fuels, a nonrenewable resource we just use up. Common knowledge is wrong, you can in fact, make it.
How is top soil formed to begin with, in the great American plains, where it is many feet deep, how did it form? Well, they say 1% of decaying organic matter ends up as stable humus in the soil. So over thousands of years as grass lived, and died, and animals grazed, and pooped, it formed. Dead grass and animal droppings? Is that it? Not quite.
We often do not think about what happens beneath the soil, but things happen, many important things. We see plants above ground dropping leaves, and twigs, and shedding organic matter all over, but it also happens beneath the soil. Roots die off, they’re abandoned by their plant and they rot. When grasses grow up big and tall they need long deep roots, when the bison wander by and munch that grass down, they don’t need those roots anymore and some are abandoned. As those roots, which in some grasses can reach down over 10 feet deep (imagine, grass roots over 10 feet deep). The roots decay and add organic matter deep within the soil, once they decay they create channels for water, air, and nutrient infiltration.
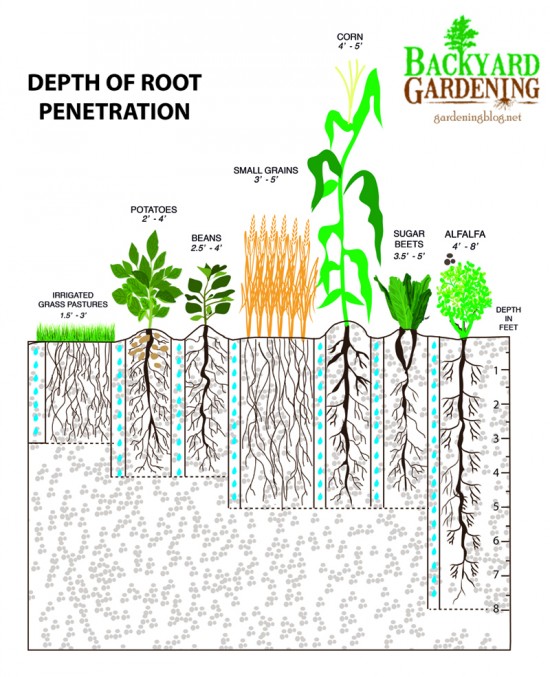
So actually, under ideal circumstances, you can add a cm or more (I’ve heard of much more) of top soil under your lawn without using a shovel by simply planting the right things and fertilizing appropriately so they grow vigorously, on an annual basis. The first thing you’ll want to do is make sure you’re planting an appropriate grass. Kentucky bluegrass is probably the most famous turf grass type, but it is horrible for practical purposes, my son happens to be allergic to it, but if that wasn’t enough it is very shallowly rooted, with roots only about 4 inches deep, this also means, in addition to not breaking and improving your subsoil, it needs frequently watering.
In contrast, tall fescue (hardy in zone 4 and warmer) can grow roots 3 feet deep, and bermuda grass (zones 8-10) can grow roots 10 feet deep. Native buffalograss can reach 8 feet of depth and worths as a turf grass.
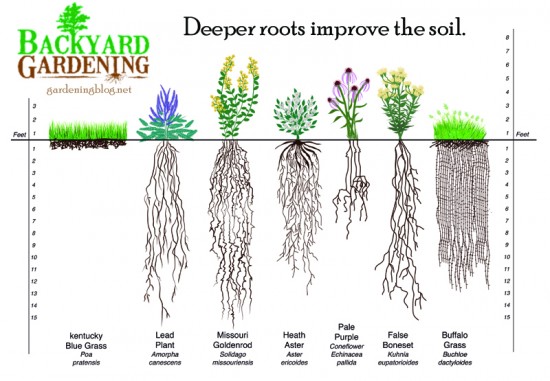
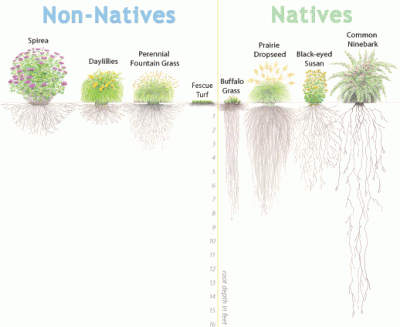
I am a big fan of planting clovers in lawns, all clovers can develop feet deep root systems, of course perennial white dutch clover, while shallower rooted compared to other clovers, is perennial and I’m a fan of seeding it in all lawns. In additions of course to the roots, they fix nitrogen helping green your lawn, and helping that grass grow better, so it can send down even deeper roots.
I know root depth is not the top of your list normally when picking plants, but in this case, research it and use it to guide your decisions.
Depth of root is also often to height of top growth, with turf grasses anyways, so if you want deep roots, let your lawn get longer. In the heat of summer this can help stave off drought, but for the specific purpose we’re talking about you also want them long, the longer the better. And then, every once in awhile, you want to let the bison graze on it, to create some destructive rebirth. Don’t have bison? Try a lawn mower, though honestly animal grazing is best as they’ll add some animal fertilizer and maybe tear up and aerate some.
So, if you want to improve your subsoil under your lawn plant deeply rooted grass varieties and include clover as well, then let it grow long between mowings (or grazings) and over time the soil will improve.
Now, suppose you want to do the same for a perennial bed or a vegetable garden, you have even better tools are your disposal. Tall perennial grasses are even more deeply rooted, many perennial flowers and other shrubs are also deeply rooted, especially native plants, some of which can grow roots up to 20 feet deep if such a depth is possible in your soil. If you have a particularly hard subsoil you want to break up you can plant daikon radish, the roots of which grow with such intense power it can break through many compacted soils. It is best planted in the fall if you’re doing so for this purpose, and you could of course harvest it but for soil health it is better to let it just die and decompose.
To prepare a new perennial bed you could plant some of these things for a year, or in the case of daikon radish you could tuck them in and among the existing plants. Make sure you fertilize so the daikon don’t starve the existing plants of nutrients. If your perennial bed is an ornamental grass one the problem will take care of itself more or less (though check, some types of ornamental grasses are not deeply rooted). But otherwise we’re talking about sacrificial plantings, things you do not intend to keep for perpetuity, and you want to grow for a year or two or three just so they can work on your soil.
You should definitely never allow dirt to just sit, always make sure something is planting and working in there, so that means plant a cover crop over winter in your veggie garden. Alfalfa is a great plant for this purpose, it has deep strong roots, and as a legume will add nitrogen to the soil. If you want to improve your dirt you can plant it, let it grow, then till it in the next season as a green manure.
I read that there is research that the root systems of plants contribute twice as much organic material to the soil during the growing season as what remains in the root system at the end of the growing season, some roots excrete various compounds and binders that help form good soils, in addition to what they contribute when they decompose. All this organic matter feeds life in the soil.
I know, this can seem like a lot, plant something, wait years, get better soil, but waiting years does beat waiting millenia, and we’re not talking about a huge monetary investment. I mean we’re talking about seeds here. Compared to yards and yards of topsoil, or renting heavy machinery, seeds are relatively inexpensive, and no one (well, no one reading this blog I’m sure), can afford to purchase enough topsoil to cover an entire homestead or farm or large market garden. So the only option is good stewardship over a long time period, but you will be rewarded in the end. Every year you’re actively planting in your soil it will get a little better, but if you plant the right things it will get a lot better.
There is this old German fairy tale where a pair of spoiled children take their parent’s hard work for granted, not appreciating what is provided for them, until a monster known as the Hugelkultur attacks their cottage on night and eats their parents, leaving the children to survive on their own.
Just kidding. It is a German word, it means “hill culture,” and in practice is a method of gardening where you bury wood and then plant on top of it.
Things like “lasagna gardening” (where you build up a raised bed by alternating layers of compost, twigs & debris, newspaper and cardboard, and soil) are a variation on this, but true hugelkultur is pretty extreme, not just laying in sticks and twigs and garden debris with soil as you build a raise bed, hugelkultur could best be describes as covering up a firewood pile with soil, so you have a mound, or a swale, or a terrace. You put whole logs down, piling them on top of each other in a long triangular shape, then cover with soil. You have this sort of mound garden. Why do this at all? The wood both increases drainage and water retention, buried wood is capable of holding water like a sponge, it becomes a buried reservoir of water for your plants, and as it decomposes it increases organic matter and microbial activity in the soil and creates air pockets. It is also a decent method in any area where a raised bed is a good idea, namely areas where the ground is too rocky, the soil too shallow, or the soil just of too poor quality to do a proper garden bed. So rather than dig a bed into the ground, you build a bed on top of ground.
Hugelkultur beds don’t have to be huge piles, they can also be built flat. You could layer logs and other wood at the bottom of a flat bed, like a raft of wood, then pile soil on top. That works too. As the wood decomposes it will of course shrink and so you need to account for that.
When I was tilling my new garden I made what you might call accidental hugelkultur. Originally my land was all forest, and I had trees felled and stumps ground, all that wood debris ended up mixed in the soil, all the roots ended up decaying in the soil. Then, when I tilled, I chopped up some roots pretty good as well. It isn’t strict proper hugelkultur where a more or less solid layer of wood is deep under the soil, however there is a lot of buried decaying wood in my garden and I will likely get a benefit from it over time.
Are there downsides with doing this? Yes. For one, if you use fresh wood, it will lock up significant amounts of nitrogen, adding some nitrogen to the pile in the form of blood meal or green manure would surely help. Already partially or mostly decayed wood (ideal) is better for this reason. Also the aforementioned shrinkage may annoy you over time, but I sort of doubt it’d be a big deal. OF course these sorts of beds cannot really be tilled (as I said above, I have some wood in my garden, but it was small pieces, not logs, and I have a heavy duty tiller than can break 4 or 5 inch roots. Burying a layer of mulch under a new bed would work the same and still allow tilling, but overall I would say this is best for areas that will be permanently planted, and not worked year after year).
One potential upside though is you could get some mushrooms. If you start with fresh logs not yet infiltrated with fungi you could inoculate the logs with edible fungi plugs or spores and then, over time, be able to harvest those mushrooms.
The overall point I want to make with this post is this. If you’re building a new raised garden bed, and you have some wood debris, not only is it okay for you to bury it at the bottom of the bed, it is actually beneficial in the long run to your soil.
My dirt is spread, my fence is up, I tilled in one brief window of no rain, and now after even more rain, and some nice warm weather, I have started to plant.
This weekend I planted 5 apple trees in my “orchard,” and two mulberry trees in my chicken run. The mulberry trees are permanent residents, but I also planted some hostas, blackberries, kiwi, grapes, and ferns in the chicken run. I won’t be having chickens this year as I am not living up there yet and able to take care of them while our house is being built, so my chicken run is my holding area for plants I need to eventually plant elsewhere once all the construction is done. I will eventually be planting tons of daylilies and hostas and other perennials in there that I currently have in pots.
I planted a combination permanent bed of about 80 strawberries and 60 asparagus at one end of my vegetable garden. I planted 8 blueberries and about 20 more strawberries among them along another edge of my vegetable garden. Normally I do not like to mix permanent plantings with seasonal plantings, and my veggie garden will be mostly seasonal plantings. However, with the deer pressure, I really need to fence in my strawberries, asparagus, and blueberries, and I have this big fenced garden (5000 sq/ft) so I’m using it. I’m putting them by the edges though so they don’t interfere with future tillings.
I’ve not done this yet, but I’m told strawberries make good companion plantings for asparagus, and decent for blueberries. Truthfully I was only going to be planting them with the asparagus but I had more strawberries than asparagus. Asparagus are of course tall and thin and willowy, they don’t case a lot of shade, and strawberries are short and spreading, able to fill in all the vacant spaces around the asparagus (which are planted fairly widely spaced). Blueberries are much the same except eventually the bushes will fill in more and the strawberries may diminish, as far as acidity goes strawberries like acid too, though not as much as blueberries, so they can both enjoy the same soil.
Finally I planted my first annual vegetables in my garden, about 300 onion sets, which at the close spacing you give onions, actually took up very little space than you’d think with a number like 300. After my pittance of a vegetable garden I had before I’m starting to experience the luxury of space I have now. 300 onions. Likewise, I recently put in my seed order for my gardening, $250, just for seeds. Admittedly I won’t use all these seeds this season, many will carry over for future years, but man, that is a lot of seeds. It should produce in the end thousands of dollars worth of produce, I will just have to figure out how to harvest and store it all.
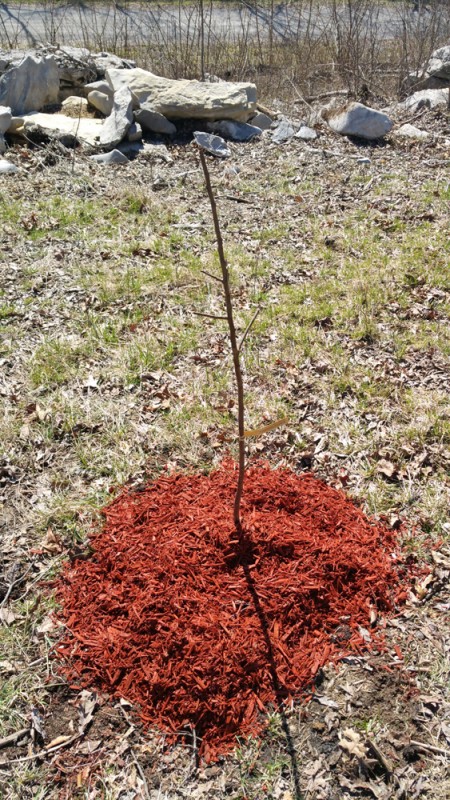
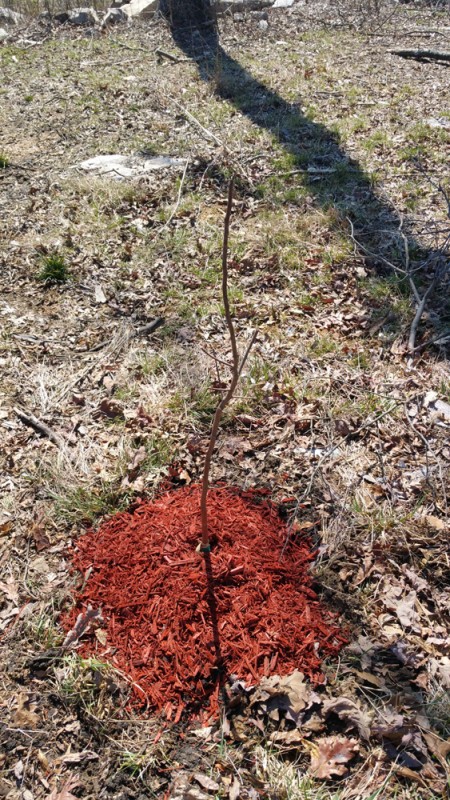
Some more pictures of what I planted:

| Thread Title | Replies |
| hi | 0 |
| savetiktok | 1 |
| Hello all | 0 |
| Онлай... | 0 |
| Hello all | 0 |
| Introduction | 1 |
| Thuja Green Giant | 0 |
| write my philosophy paper for me | 0 |
| I am looking for some advice. | 4 |
| Fruit that's really nice, but not c... | 0 |
|
Members: 3189 | Posts: 3761 Come Join the Discussion Today! |
|